|
|
Post by Arnie Benton on Dec 7, 2015 13:32:03 GMT -6
Here are a few bowls from today's kiln opening - they illustrate the effects of striking on layered glazes on horizontal surfaces. They also illustrate 2 very old problems - crazing and no crystals in the center.   Regarding the crazing - this is a combo 413/3110 glaze. I've tried decreasing frit and increasing Si. I've tried adding Alumina and clay. Now I'm thinking about changing the ratio of the frits. As to no crystals in the center, maybe it's because the center is inside the foot and gets hotter as it is closer to the shelf? For that I would decrease the top temp (now cone 10 touching) and maybe reduce the Zn a little? Any other ideas besides seeding? Arnie |
|
|
|
Post by Koz on Dec 7, 2015 14:00:17 GMT -6
Arnie,
I would say the center is cooler because it is closer to the shelf.
The shelf can act as a bit of a "heat sink", and is actually cooler than the atmosphere of the kiln and other pieces that aren't as thick as the shelf itself. A thin silicon carbide shelf would not hold as much heat and therefore transfer more heat to the piece on it, and is a variable to consider. I don't know what you are using.
In my experience, especially with thick corderite shelves, that is the case, and more so with stoneware glazes that can run too much of the sides of pieces. If I have a piece I think might be a bit more runny due to the glaze thickness or if it has copper under it and may over flux, I fire it on the bottom thick corderite shelf, and that seems to eliminate some of the heatwork that otherwise might make it melt too much and weld itself to the shelf.
Also consider that the glaze is thicker in the center of the bowl, as it only runs down the inside to the center. Glazing bowls to compensate for this is tricky, as less needs to be applied in the center and more on the perimeter.
But for sure a little bitty fleck of zincite in the middle should do the trick, regardless of how thick the glaze might be in the center.
Back off the application a bit and it should eliminate the severe crazing as well.
That's all I got on that, still stuck here in stoneware land gearing up for two more shows. Dragon #2 isn't as much fun as she use to be since she quit drinkin'.
Koz
|
|
|
|
Post by Arnie Benton on Dec 7, 2015 14:31:32 GMT -6
Hi Koz -
Thanks for the info - I have the Advancer shelves - don't know if they make the inside of the bowl hotter or cooler. I'll try applying less glaze -
and look for the zincite - I think I know which shelf it's on -
I've had to cut down on my drinking too - but a little does as much as I need to enjoy myself. Dragons and people all get older. I haven't done a reduction firing in months - and even then I've been cutting down the time and amount of reduction - 7 or 8 minutes instead of 30 to 45.
Arnie
|
|
|
|
Post by mohawkpiper on Dec 7, 2015 18:14:11 GMT -6
Koz, it's good to see you back! I have been playing with flat a lot more lately than I ever really have before. It has been a whole new challenge but a lot of fun. I would have to agree with Koz about the application thickness. Same thing... back off the application in the center and crazing should be reduced and crystals should start showing up more. Seems flat is harder to hit the right window in glaze thickness, as it has nowhere to go so your application thickness matters more with flat. Whereas vertical it still matters to a degree, but seems clay thickness and heatwork matter more there because the melt is more important since it is running. I'm still figuring it out myself... I now have separate glazes for the same glaze for flat vs vertical (mostly the base being different) but if I apply the flat right they can go in the same firing and get similar results. 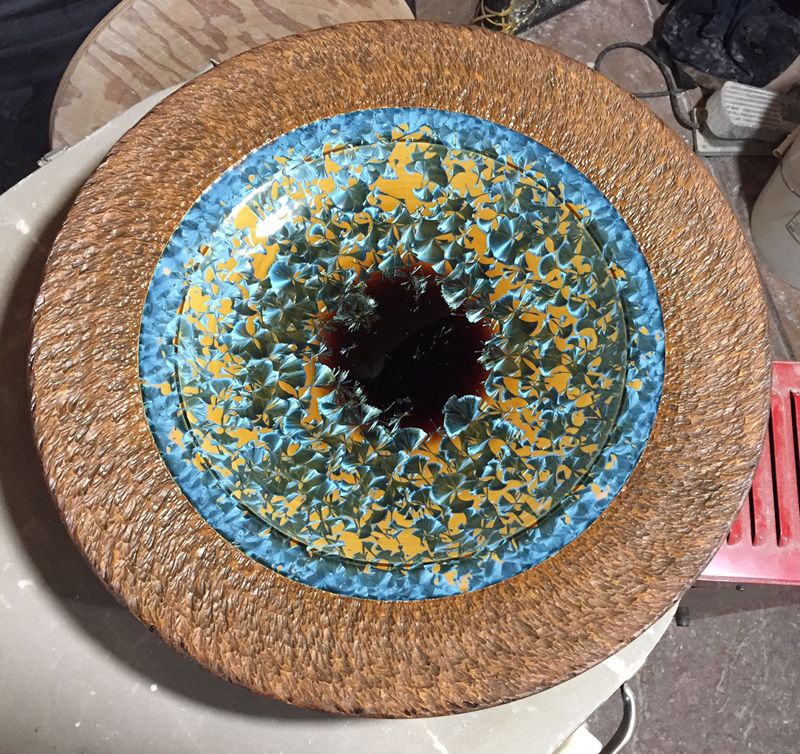 This one was much more bowl shaped than the rest so the glaze collected more in the center... notice the darker color giving away the thicker glaze but also no crystals there, and crazing is only in the center... on the same note, if you had an even layer of glaze in the end from edge to center you wouldn't have the streaking and differing colors you are getting so it's a give or take kind of situation and a fine like to walk to get both. G |
|
|
|
Post by mohawkpiper on Dec 8, 2015 14:15:17 GMT -6
Then again I had this one a little while ago... 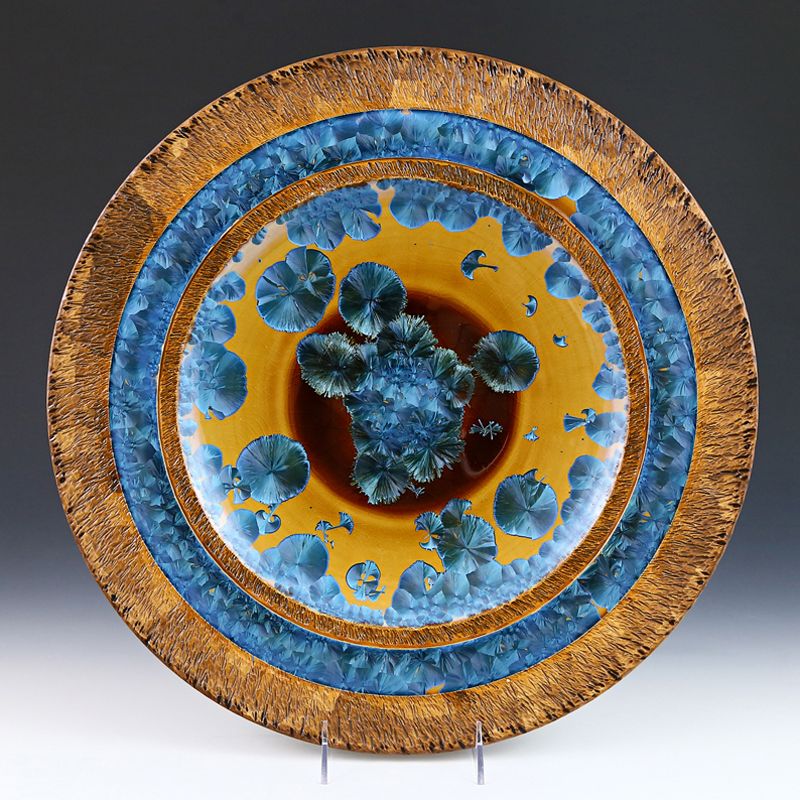 the crystals pick up on the edges and in the center. The edges are definitely thinner. The center seems thicker but it's hard to tell from the image and I sold it already. Maybe in the very very center where the crystals pick up the clay bottom sort of mounds back up like a little hill and it is in fact thinner? I dunno. This is a slightly different glaze though than the previous. I was playing with nickel a little while ago and I've just been tryin all the different ones I liked on vertical. This one has some manganese in it and the previous one does not. G |
|
|
|
Post by Arnie Benton on Dec 8, 2015 16:39:49 GMT -6
Hi Greg -
For every explanation there seem to be exceptions - maybe it's something with the clay at the bottom of the platter, as you say -
So much of this crystalline glaze obsession is predictably unpredictable.
For my next attempt I'm going with a loading of .35 or a little less. I've been doing .4 - and decreasing the zinc by a gram or so.
And the oxides make a difference as does the amount of Ti - and the firing schedule -
Oh well -
Arnie
|
|
|
|
Post by tileman2 on Dec 9, 2015 18:17:12 GMT -6
Arnie: Two things on the first bowl: I see a concentric glazing ring that I suspect lines up with the foot where it made contact with the shelf. 2nd. I noticed all of your TiO2 stayed up on the rim; overpopulated. I think the uneven heat/cool where the piece makes contact with the shelf is correct as suggested. However, I view it as a mechanical:  Just dust the tops of the slats with SiO2, because I know you do not like to use catchers. This will allow equal heat/cool on the top and bottom of your piece. A possible solution to the seeding problem: set your TiO2 aside and mix your glaze: put in half when you are doing the rim, and the other half when doing the sidewalls and bottom. Another step in the process I know- but a thought. I run my tile at .40G per S.I; get below that and you will also have problems with bare spots and diminished crystals. Curious to know what your alumina additions are? For the record: ATH - alumia tri-hydrate is much purer product than AH - alumina hydrate. The specs on AH states (90% purity), the rest is mainly sodium. The spike/cluster formations on the bottom of the second piece remind me of sodium problems. Tom |
|
|
|
Post by jerrysawitz on Dec 9, 2015 20:42:38 GMT -6
whatever you did Greg, thats a kick ass piece. it is rich with textural contrast and color. the design has wonderful balance. in the end, if someone found it worthy of parting with their dollars, i say "well done."
|
|
|
|
Post by mohawkpiper on Dec 10, 2015 2:58:05 GMT -6
Tom, what do you mean by the titanium stayed up on the rim? I don't think the metals in the glaze separate from each other in different areas. If the glaze was mixed well, it should all be a whole everywhere shouldn't it? The difference in color from center to rim is a property of the glaze just being thinner and thicker in different areas no? That mechanical solution under your bowl might work well to help even out the heat but what does it do to the form? Does it cause the piece to warp or even crack for larger pieces? I haven't tried it like that but in the past i have put large platters across two half shelves forming one shelf that were a little uneven in height and it seems to cause problems for me. Occassionally i put stuff up on a kiln brick on the shelf so i can see it in the back over the stuff in the front (through the peephole) but as long as the whole catcher fits on the brick i dont have problems with warping. Personally I am not too big on dusting the shelves or slats with free alumina or silica because if for whatever reason the atmosphere happens to get stirred up a little (mostly happens in reduction) the free dust stirs up in the air and settles on the piece causing an area or two or more of serious seeding and overnucleation. Jerry, Thanks. I've been having fun with these. I recently sold one with a teal glaze and white chattering to the president of the 49ers at a private event  I give credit to Arnie for persuading me to start doing flat |
|
|
|
Post by mohawkpiper on Dec 10, 2015 3:11:44 GMT -6
Arnie you could also alter your glaze to be less runny so not so much of it comes into the center.
|
|
|
|
Post by Arnie Benton on Dec 10, 2015 9:59:16 GMT -6
Tom - Those circular cracks are actually inside the foot. I wonder if circular cracks are a different phenomenon than the network of cracks we call crazing. The network of cracks seems pretty correlated with glaze thickness - the circular cracks I picture as step one in the process that leads to pieces cracking in half.
I don't think the Ti is unevenly distributed, unless it 'stays behind while the rest of the glaze flows downward. But leaving explanations aside, what you're suggesting could be a way to get more crystals in the center - I've been putting Silica sand on the shelf to try to cut down on breakage - I do think that lifting the piece off the shelf with slats will result in warping - at least when I fire to cone 10.
Greg - Aw, shucks! Cooling in the kiln right now are pieces like the 2 pictured above with .35, .325 and .30 g/sq inch loading. We shall see. I'd probably add some Alumina or calcined clay to cut down on 'runnyness' - but don't know what that will do to the background.
Arnie
|
|
|
|
Post by tileman2 on Dec 10, 2015 20:21:36 GMT -6
Arnie: I have been experimenting with TiO2 and alumina additions for some time. This platter I mixed the glaze, add a very small amount of TiO2 and coated the rim. Then I added the rest of the TiO2 and coated the bottom: then added the alumina and did the side walls. In essence- a semi/quasi form of seeding.  Have also been doing the same with the vertical pieces; without using catchers.  The foot is the strongest part of the piece: have fired both cone 6 and 10 with slates up to 5" across. Have never had one slump. TiO2 has similar properties to AL2O3 in that it resists flow. Edit: Greg, I have only used the slats on pieces up to 6" across at the foot. Big pieces like what Jim throws would be too much weight- would agree. I do 14 x 16 tiles with slates across at 2" intervals- never a problem. But yes if the piece was very heavy, or a very broad foot- probably a risk. Flat work has it owns set of parameters- some shared with vertical, some unique.One big issue is glaze flow- not even close to the same. Tom |
|
|
|
Post by evan cornish-keefe on Dec 10, 2015 21:19:40 GMT -6
Regarding the crazing - this is a combo 413/3110 glaze. I've tried decreasing frit and increasing Si. I've tried adding Alumina and clay. Now I'm thinking about changing the ratio of the frits. Hey Arnie, I agree that a thinner coat of glaze at the bottom would help form more crystals and reduce crazing. I'm sure the concentric craze lines are due to glaze thickness, they also will weaken the clay body at those faults. Could you give the full recipe of your glaze, and the silica and alumina alterations you've tried? Frit 413 may have a lower expansion than 3110, but it's still a high expansion frit. I typically have the opposite problem of too many crystals at the bottom of my bowls. |
|
|
|
Post by Arnie Benton on Dec 12, 2015 16:50:07 GMT -6
Here are the results of applying .30 to .35 gm/sq inch of dry glaze - 1 - crystalline firing after striking   2 - crystalline firing after striking   3 - crystalline firing after striking   Quite successful - Less glaze produced better spaced crystals and NO CRAZING. No areas of too thin glaze. And nice looking pieces. I soaked at 2040 degrees and that looks too high - I think the crystals would be bigger at a lower temp. HOWEVER - and isn't there always a however? - one piece split in half, right through the center - no crazing but it totally split - SO, aside from a dose of humility, it looks like crazing and splitting aren't connected - I thought of them as on a continuum - more crazing leads to more breakage - a sign that the glaze and clay aren't playing well together - but, no. But, maybe making major changes to the glaze recipe - which never worked for me anyway - isn't the best way to go - maybe it's glaze thickness that's the most important variable to manipulate. So Evan - I could send you on a 'wild goose chase' with glaze additions and subtractions, but none of them ever worked for me - so try putting on less glaze first - I must stress what to me is most important - quantify the amount of glaze you are applying - by amount per square inch of surface - it has to be an approximation because figuring out the surface area of a vase is a lot more complicated, I think maybe impossible, than finding the surface area of a bowl or plate - but worth doing anyway - maybe some vase maker can explain his or her technique. Arnie |
|
|
|
Post by tileman2 on Dec 12, 2015 22:12:21 GMT -6
Arnie:
The cheap glass cutters ($3) at the hardware store have a small steel ball on one end. I use it to lightly tap my bisque tiles before I glaze them. If I get a hollow sounding thud instead a nice tink: then I know it has a defect in the body that will split in the kiln. If your split plate has a sharp edge then it split during the cooling cycle. If it has a smooth edge where the glaze slumped over it slightly: then it split on the way up. Might save you some aggravation to test them for fissures before you glaze fire. Hope it helps.
Tom
|
|


